Make your own UTP network cable
Before we begin, let’s be clear about the types of cable we are going to discus here: UTP cables – straight or crossed.
The straight cable is what you use to connect a computer or printer to you router or modem. So this would be your NORMAL network cable.
 The crossed cable (rarely used) is for situations where there is no router involved and you’d like to computer (or other devices) directly to another computer. For example for temporary exchange of files. Note that the names can be confusing!
If you have never heard of a crossed network cable then it will be pretty safe to say that you do not need that one!
Tools & Supplies
For both scenario’s we need some supplies and tools.
Making a Normal Network Cable
The wires need to be in a very particular order (same on both ends).
| Pin | Color |
|---|---|
| 1 | Orange – White |
| 2 | Orange |
| 3 | Green – White |
| 4 | Blue |
| 5 | Blue – White |
| 6 | Green |
| 7 | Brown – White |
| 8 | Brown |
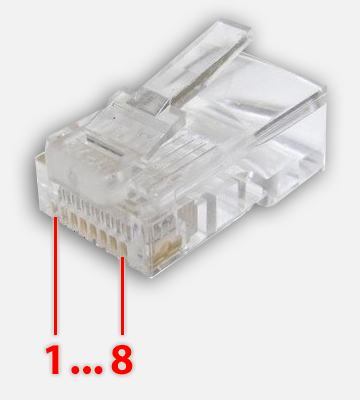
The pin numbering works as such:
Making A Crossed Network Cable
Like I mentioned before; crossed network cables are rarely used. A typically application is to connect 2 network devices without having a network – for example 2 computers or a computer and a NAS or printer. In any of these cases you, of course, will need to set a manual IP address, subnet mask, etc. Keep that in mind! It’s usually a headache to work with.
The entire process is the same, however the wires are crossed, for one of the two cable ends (the other end is done like a normal cable) – we basically connect the TX (send) kabel of one side to the RX (receive) pin of the other side:
| Pin | Color |
|---|---|
| 1 | Green – White |
| 2 | Green |
| 3 | Orange – White |
| 4 | Blue |
| 5 | Blue – White |
| 6 | Orange |
| 7 | Brown – White |
| 8 | Brown |
Nessun commento:
Posta un commento